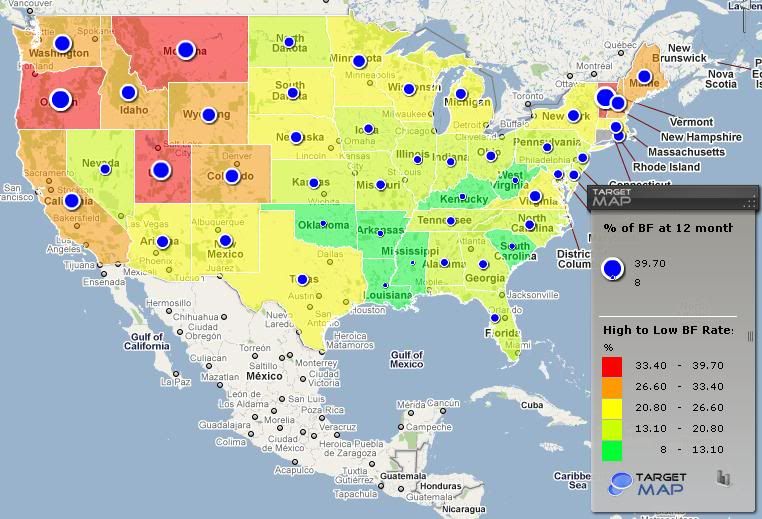
map from www.targetmap.com click on the first map on the page and it will bring up a large interactive map.
I'm proud to say I am in the 15.9% of moms in Alabama who breastfeed beyond 12 months. Or rather - I WILL be, since my baby is yet 11 months. This article by Cafe Mom is based on the CBS article that gathered the CDC data on breastfeeding beyond 12 months of age. Sadly, it shows that less than half of all moms breastfeed beyond 12 months. Yet the American Academy of Pediatrics (AAP) says to breastfeed for AT LEAST one year, and the World Health Organization (WHO) says to breastfeed for AT LEAST two years! The world average for weaning is actually four years. America relies too heavily upon formula and cow's milk.
The south has major problems when it comes to extended breastfeeding. Almost all of the 10 states with the lowest rates of extended breastfeeding are below the mason-dixon line. Is it because we seriously lack breastfeeding education? Is it because the south holds the nation's poverty states? Yes, and yes. It is especially hard to receive support to breastfeed while working full time. I have seen even casually on Facebook women who do not understand or see the value of nursing beyond 12 months of age. This article at Kellymom.com lists facts with scientific references of why breastfeeding beyond 12 months is still best for mom and baby.
Highlights of why breast is still best beyond 12 months (from kellymom.com):
- "Breastfeeding continues to be a valuable source of nutrition and disease protection for as long as breastfeeding continues." The benefits of breast milk do not suddenly expire at 12 months. It also supplies complete nutrition to toddlers and babies alike. Many toddlers do not eat well; with breastfeeding, a mom need not worry.
- Breastfed children are sick less often. The WHO quotes "a modest increase in breastfeeding rates could prevent up to 10% of all deaths of children under five: Breastfeeding plays an essential and sometimes underestimated role in the treatment and prevention of childhood illness."
-Breastfed children have fewer allergies
-Breastfed children are smart. There is evidence that breastfed children have higher IQ's. (There are a ton of references on Kellymom.com - check it out)
-Breastfed children are well adjusted. I know breastfeeding is my all purpose mothering tool that I'm not about to give up. It solves almost any problem, and research indicates that meeting a child's needs in this way creates a MORE independent child later in life.
-Breastfeeding past infancy is normal. As already stated, the average weaning age the world over is age 4. In fact, there are a lot more extended nursing moms than we know because they are often too embarrassed to nurse in public for fear they will be criticized or seen as weird. Also, you don't see toddlers breastfeeding in public as much as infants because they simply do not need to nurse as often. I think the only way to make extended breastfeeding normal is to go ahead and breastfeed out of the proverbial closet!
-Breastfeeding benefits the mother past infancy. All the great things breastfeeding can do for you still apply. Breastfeeding reduces the risk of ovarian, breast, uterine, and endometrial cancer. It also helps prevent osteoporosis and arthritis. And of course, breastfeeding moms lose weight easier.
I hope this encourages those who are considering extended breastfeeding and encourages others to support women who are breastfeeding! I can proudly say I was breastfed until I was 2.5 years old. This was in the late 70's early 80's when hardly anyone breastfed. Thanks, Mom!
Wednesday, June 29, 2011
Tuesday, June 28, 2011
Tasty Tuesday- Homemade Veggie Stock
I buy veggie broth for a variety of things besides just soup. Though we do go through a ton of veggie broth in the winters for soup, I use broth year round to cook rice and quinoa so the grains will actually taste like something. I buy organic veggie broth which I can get for less than $3 on sale. Lately it occurred to me that I could make my own broth!
I found a great tip online - whatever vegetable "leavins" you have, i.e. the ends of onions, peppers, squash, the stalks of kale, stems of spinach, potato peels, etc, etc, put them in a freezer bowl or bag. Be sure to thoroughly wash the whole vegetable before you chop it so your "leavins" will be clean! Whenever the bowl or bag fills put the frozen vegetable pieces in a big pot and make veggie stock! This method certainly puts your unused vegetable portions to good use and then costs you absolutely nothing extra! Talk about green!
Homemade Vegetable Stock
Fill a large stock pot with a variety of vegetable at least 1/2 full.
Vegetables should include onions, and anything else you desire.
Add three cloves of garlic, whole, skins and all, but smashed with a knife.
A couple bay leaves, a handful of fresh parsley, and 10-15 whole peppercorns if you have it.
Add three tsp salt (or to taste). Adjust depending on the amount of water you add.
Fill the pot with water so it completely covers the vegetables.
Bring to a boil and then reduce to a simmer. Simmer for at least one hour - you don't have to watch the clock too closely. Strain into jars. Broth will keep in the refrigerator for about a week and in the freezer for about two months.
I found a great tip online - whatever vegetable "leavins" you have, i.e. the ends of onions, peppers, squash, the stalks of kale, stems of spinach, potato peels, etc, etc, put them in a freezer bowl or bag. Be sure to thoroughly wash the whole vegetable before you chop it so your "leavins" will be clean! Whenever the bowl or bag fills put the frozen vegetable pieces in a big pot and make veggie stock! This method certainly puts your unused vegetable portions to good use and then costs you absolutely nothing extra! Talk about green!
Homemade Vegetable Stock
Fill a large stock pot with a variety of vegetable at least 1/2 full.
Vegetables should include onions, and anything else you desire.
Add three cloves of garlic, whole, skins and all, but smashed with a knife.
A couple bay leaves, a handful of fresh parsley, and 10-15 whole peppercorns if you have it.
Add three tsp salt (or to taste). Adjust depending on the amount of water you add.
Fill the pot with water so it completely covers the vegetables.
Bring to a boil and then reduce to a simmer. Simmer for at least one hour - you don't have to watch the clock too closely. Strain into jars. Broth will keep in the refrigerator for about a week and in the freezer for about two months.
Wednesday, June 8, 2011
Soaking grains and nuts - an update
I posted a couple weeks ago about Soaking Grains and I promised a follow-up. Basically I have soaked oatmeal, rice, and almonds. I soaked oats in yogurt starting the night before. In the morning we (actually my husband) cooked the oats as usual on the stove top with the soaking liquid. Well, I didn't like the flavor so much. You can very much taste the fermentation. HOWEVER, draining the soaked oats and rinsing a bit gets rid of the fermentation taste. Not bad. I made granola from soaked, drained and rinsed oats and I didn't taste fermentation at all, however - I think I did it wrong. I'll post about that when I get it right.
Soaking and then dehydrating almonds, however, is DELICIOUS! I soaked almonds with water and yogurt for 8 hours. I, drained, rinsed, and spread them on a baking sheet. I put them in the oven for 8 hours at 175F. They came out beautifully crunchy and with that yummy roasted taste. I made almond butter with these almonds and it was the best almond butter I've made thus far. I'm definitely going to soak and dehydrate all my almonds from now on.
My friend made bread from soaked wheat last week - maybe she will share the recipe so I can test that out next!
Soaking and then dehydrating almonds, however, is DELICIOUS! I soaked almonds with water and yogurt for 8 hours. I, drained, rinsed, and spread them on a baking sheet. I put them in the oven for 8 hours at 175F. They came out beautifully crunchy and with that yummy roasted taste. I made almond butter with these almonds and it was the best almond butter I've made thus far. I'm definitely going to soak and dehydrate all my almonds from now on.
My friend made bread from soaked wheat last week - maybe she will share the recipe so I can test that out next!
Tuesday, June 7, 2011
Tasty Tuesday- Honey Whole Wheat BAGELS!
Homemade bagels!? Yes, please!!
This recipe is from Heavenly Homemakers which is a great recipe blog.
Honey Whole Wheat Bagels
4 to 4 1/2 cups whole wheat flour
1 pkg yeast (2 1/4 teaspoons)
1 1/2 cups warm water (110F ish, or just warmer than your hands)
3 Tablespoons honey + 1 Tablespoon honey
1 teaspoon sea salt
and if you want cinnamon raisin bagels:
2 teaspoons cinnamon (optional)
1/2 c raisins (optional)
Stir together 2 cups of the flour, the salt and the yeast. Add in the warm water and 3 Tablespoons honey. Gradually add in the remaining flour.
Dump it out and knead the flour in until the dough is smooth and elastic. Cover the dough and let it sit for about 10 minutes.
Divide the dough into twelve equal parts using a pastry scraper or floured butter knife.
Set a timer for 20 minutes. Begin shaping each piece of dough into a nice ball. Stick your finger in the middle of the ball and pull it apart to create about a 2 inch hole. Lay it onto a buttered cookie sheet or baking stone. Continue until all the bagels are formed. Let them sit until your timer goes off.
After your 20 minute timer goes off, turn the broiler on in your oven.
Broil your bagels for 2 minutes on each side.
Meanwhile…bring a big pot of water to a boil. Stir in the remaining 1 T. honey.
Put 4-6 bagels into the water, turn down the heat and simmer for seven minutes, turning the bagels over once during that time. Continue to boil your bagels until they are all done. Let them drain on a towel for 1-2 minutes.
Bake at 375 ° for 25-30 minutes or until the tops are golden brown.
This is a good "base" recipe for bagels too. You can add cinnamon and raisins (like the options I put in the recipe) or other kinds of dried fruit. They could also be a savory bagel, or add chopped nuts!
This recipe is from Heavenly Homemakers which is a great recipe blog.
Honey Whole Wheat Bagels
4 to 4 1/2 cups whole wheat flour
1 pkg yeast (2 1/4 teaspoons)
1 1/2 cups warm water (110F ish, or just warmer than your hands)
3 Tablespoons honey + 1 Tablespoon honey
1 teaspoon sea salt
and if you want cinnamon raisin bagels:
2 teaspoons cinnamon (optional)
1/2 c raisins (optional)
Stir together 2 cups of the flour, the salt and the yeast. Add in the warm water and 3 Tablespoons honey. Gradually add in the remaining flour.
Dump it out and knead the flour in until the dough is smooth and elastic. Cover the dough and let it sit for about 10 minutes.
Divide the dough into twelve equal parts using a pastry scraper or floured butter knife.
Set a timer for 20 minutes. Begin shaping each piece of dough into a nice ball. Stick your finger in the middle of the ball and pull it apart to create about a 2 inch hole. Lay it onto a buttered cookie sheet or baking stone. Continue until all the bagels are formed. Let them sit until your timer goes off.
After your 20 minute timer goes off, turn the broiler on in your oven.
Broil your bagels for 2 minutes on each side.
Meanwhile…bring a big pot of water to a boil. Stir in the remaining 1 T. honey.
Put 4-6 bagels into the water, turn down the heat and simmer for seven minutes, turning the bagels over once during that time. Continue to boil your bagels until they are all done. Let them drain on a towel for 1-2 minutes.
Bake at 375 ° for 25-30 minutes or until the tops are golden brown.
This is a good "base" recipe for bagels too. You can add cinnamon and raisins (like the options I put in the recipe) or other kinds of dried fruit. They could also be a savory bagel, or add chopped nuts!
Saturday, June 4, 2011
Cloth Considerations for the Crawler
You may remember my post on cloth diapers and their benefits including the financial, environmental, and health considerations. Now that my baby is active and mobile, I have a few more things to ponder when choosing a diaper.
I chose a type of cloth diaper that was the cheapest, basically. I found the covers and prefolds option to be easy enough and the financial savings is significant. However, now that I have a very active ten month old who can hardly sit still, I find myself longing for an All-In-One or pocket diaper as opposed to prefolds and covers. My baby absolutely will not lie on her back ever since she started crawling. I'm sure diaper changes become a problem for many parents of nine month olds; my neighbor's daughter screams through every diaper change now! But it is especially hard to get a prefold to sit in a cover, arrange the prefold and snap the cover around all while my baby is trying to roll over and crawl away. An All-In-One or a pre-stuffed pocket diaper would cut out the extra step of arranging a prefold, thus, hopefully, becoming a little easier to strap the thing on the little wiggle worm.
I'm pretty sure I'm going to go ahead and invest in three pocket diapers just for night time. Her night time diaper is extremely bulky and the wiggling makes it darn near impossible to put on. I'm hoping it will also cut down on the bulk.
So my advice - cloth diapers still rock! But if I could do it over again, and had the money, I'd get pocket diapers for sure.
I chose a type of cloth diaper that was the cheapest, basically. I found the covers and prefolds option to be easy enough and the financial savings is significant. However, now that I have a very active ten month old who can hardly sit still, I find myself longing for an All-In-One or pocket diaper as opposed to prefolds and covers. My baby absolutely will not lie on her back ever since she started crawling. I'm sure diaper changes become a problem for many parents of nine month olds; my neighbor's daughter screams through every diaper change now! But it is especially hard to get a prefold to sit in a cover, arrange the prefold and snap the cover around all while my baby is trying to roll over and crawl away. An All-In-One or a pre-stuffed pocket diaper would cut out the extra step of arranging a prefold, thus, hopefully, becoming a little easier to strap the thing on the little wiggle worm.
I'm pretty sure I'm going to go ahead and invest in three pocket diapers just for night time. Her night time diaper is extremely bulky and the wiggling makes it darn near impossible to put on. I'm hoping it will also cut down on the bulk.
So my advice - cloth diapers still rock! But if I could do it over again, and had the money, I'd get pocket diapers for sure.
Thursday, May 26, 2011
Soaking Whole Grains
I've been interested lately in soaking or sprouting grains. I've read a few things, and generally become overwhelmed. I tried sprouting brown rice once, and nothing happened. There are tons of "how to's" on sprouting grains - each one seems long and convoluted. I just discovered there is a difference between soaking grains and sprouting grains. Soaking grains is easier than sprouting grains, and mimics the sprouting process, though probably does not attain the same results. I'm going to go for soaking, for now.
Soaking seems to be a little controversial. Some people say it is the only way the body can digest grains, others say that it is a big fat waste of time. The following "why's" of soaking grains I found on the blog Kitchen Stewardship. She studies soaking and sprouting in depth, if you are interested.
Grains are nothing more than seeds. If you've ever seen baby poop after a baby has eaten blackberries, or various mammal poop on a nature hike, then you know seeds do not get digested. They come out the way they came in. The body has enzymes specifically to inhibit the digestion of these seeds. Little nutrition is rendered from the grain. Sprouts, however, are vegetables and very nutritious. Sprouting grains essentially turns it from a seed to a vegetable. Grains also have enzymes, phytic acid, that prohibits digestion. This Phytic acid prevents the grain from premature sprouting. Consuming too much phytic acid can cause mineral deficiencies and poor bone density. Soaking and sprouting grains breaks down phytic acid. There is also some suggestion that soaking begins the digestion process thus breaking down tannins that can irritate the stomach and it also starts to break down proteins like gluten. Soaked grains are often more tolerable to those with gluten sensitivities.
By the way, this applies for all beans, legumes, seeds, and NUTS! as these are all seeds. I hardly prepare beans from their dry form (using mostly canned) but I really should get into dry beans. Nuts are a whole other subject. Apparently they too contain phytic acid... maybe another day.
Soaking grains mimics sprouting grains, and I think soaking is easier and faster. Here is the process I'm going to follow:
What you need:
Your grain - must be a whole grain (brown rice, oats, etc.)
An acidic medium
Water
A jar
1. Combine the grains with the appropriate amount of water plus 1 Tbs of acidic medium per cup liquid.
2. For brown rice, for example, combine 1 cup rice with 2 cups water and 2 Tbs lemon juice or vinegar.
3. Allow to soak at room temperature (or above) for 7-24 hours, depending on the grain. Rice needs only 7 hours minimum, oatmeal 12-24. Aim for an overnight soak.
4. Simply cook as normal on the stovetop. If you'd like to rinse the soaking water off your grains, and they are still whole enough to be able to, you may.
I've noticed that people use yogurt, kefir, or whey to soak oats, and I've also seen people use Apple Cider Vinegar for rice and whatnot. I guess it doesn't matter what acid you use.
I'll post an update when I get this right. I soaked my oatmeal last night, but I soaked it in the refrigerator, which is apparently wrong. Because I was soaking it with yogurt, I thought it would get funky. I guess you WANT it to get funky because you are trying to ferment the grain. Will try again tonight.
If you have anything to add, I got anything wrong, or have suggestions, please leave a comment. I'm just trying to navigate my way through sprouting and soaking!
Soaking seems to be a little controversial. Some people say it is the only way the body can digest grains, others say that it is a big fat waste of time. The following "why's" of soaking grains I found on the blog Kitchen Stewardship. She studies soaking and sprouting in depth, if you are interested.
Grains are nothing more than seeds. If you've ever seen baby poop after a baby has eaten blackberries, or various mammal poop on a nature hike, then you know seeds do not get digested. They come out the way they came in. The body has enzymes specifically to inhibit the digestion of these seeds. Little nutrition is rendered from the grain. Sprouts, however, are vegetables and very nutritious. Sprouting grains essentially turns it from a seed to a vegetable. Grains also have enzymes, phytic acid, that prohibits digestion. This Phytic acid prevents the grain from premature sprouting. Consuming too much phytic acid can cause mineral deficiencies and poor bone density. Soaking and sprouting grains breaks down phytic acid. There is also some suggestion that soaking begins the digestion process thus breaking down tannins that can irritate the stomach and it also starts to break down proteins like gluten. Soaked grains are often more tolerable to those with gluten sensitivities.
By the way, this applies for all beans, legumes, seeds, and NUTS! as these are all seeds. I hardly prepare beans from their dry form (using mostly canned) but I really should get into dry beans. Nuts are a whole other subject. Apparently they too contain phytic acid... maybe another day.
Soaking grains mimics sprouting grains, and I think soaking is easier and faster. Here is the process I'm going to follow:
What you need:
Your grain - must be a whole grain (brown rice, oats, etc.)
An acidic medium
Water
A jar
1. Combine the grains with the appropriate amount of water plus 1 Tbs of acidic medium per cup liquid.
2. For brown rice, for example, combine 1 cup rice with 2 cups water and 2 Tbs lemon juice or vinegar.
3. Allow to soak at room temperature (or above) for 7-24 hours, depending on the grain. Rice needs only 7 hours minimum, oatmeal 12-24. Aim for an overnight soak.
4. Simply cook as normal on the stovetop. If you'd like to rinse the soaking water off your grains, and they are still whole enough to be able to, you may.
I've noticed that people use yogurt, kefir, or whey to soak oats, and I've also seen people use Apple Cider Vinegar for rice and whatnot. I guess it doesn't matter what acid you use.
I'll post an update when I get this right. I soaked my oatmeal last night, but I soaked it in the refrigerator, which is apparently wrong. Because I was soaking it with yogurt, I thought it would get funky. I guess you WANT it to get funky because you are trying to ferment the grain. Will try again tonight.
If you have anything to add, I got anything wrong, or have suggestions, please leave a comment. I'm just trying to navigate my way through sprouting and soaking!
Monday, May 23, 2011
Once a cesarean always a cesarean?
Many doctors today still push a woman into having a repeat cesarean because they were taught it was safer than attempting a vaginal birth after cesarean (VBAC). The good news is that the American College of Obstetricians and Gynecologists (ACOG) have recently come out and said this is unnecessary!
ACOG released a statement last year saying: "Attempting a vaginal birth after cesarean (VBAC) is a safe and appropriate choice for most women who have had a prior cesarean delivery, including for some women who have had two previous cesareans." It also states that 60-80% of appropriate VBAC candidates go on to be successful. (The other 20-40% have a C-Section.)
A previous C-Section does not have to foil a desire for a vaginal or natural birth. Many women also go on to have HBAC - a home birth after cesarean!
ACOG released a statement last year saying: "Attempting a vaginal birth after cesarean (VBAC) is a safe and appropriate choice for most women who have had a prior cesarean delivery, including for some women who have had two previous cesareans." It also states that 60-80% of appropriate VBAC candidates go on to be successful. (The other 20-40% have a C-Section.)
A previous C-Section does not have to foil a desire for a vaginal or natural birth. Many women also go on to have HBAC - a home birth after cesarean!
Subscribe to:
Posts (Atom)
